12|第一个 LangGraph:用状态、节点和边搭工作流
亲手定义状态、节点、条件边并编译第一个图。
亲手定义状态、节点、条件边并编译第一个图。
MCP 像 USB-C:统一连接形状,设备仍有不同能力和权限;兼容不等于可信。
本课交付物
画出本地文件 MCP 的信任边界,配置只读目录并验证越界请求失败。
核心讲解
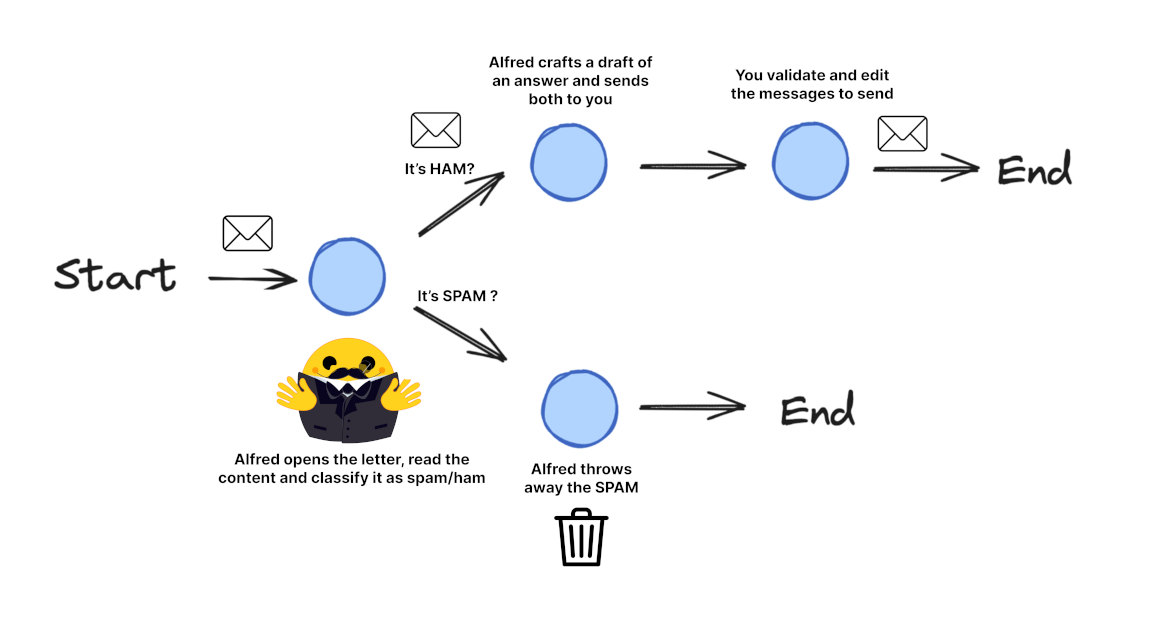
现在我们已经理解了基本构建模块,让我们通过构建第一个功能图来实践。我们将实现 小安 的邮件处理系统,他需要:
- 阅读 incoming emails
- 将其分类为 spam 或 legitimate
- 为 legitimate 邮件起草初步响应
- 当邮件合法时向 Mr. Wayne 发送信息(仅打印)
这个示例演示了如何使用 LangGraph 构建涉及基于 LLM 决策的工作流程结构。虽然这不能算是真正的 Agent(因为没有涉及工具),但本节更侧重于学习 LangGraph 框架而非 Agents。
提示:
你可以在 这份动手实验 中查看完整代码,并通过 本地实验环境 运行。
工作流程
这是我们将要构建的工作流程:
环境设置
首先安装必要的包:
%pip install langgraph langchain_openai
接下来,让我们导入必要的模块:
from typing import TypedDict, List, Dict, Any, Optional
from langgraph.graph import StateGraph, END
from langchain_openai import ChatOpenAI
from langchain_core.messages import HumanMessage, AIMessage
步骤 1:定义我们的状态
让我们定义 小安 在电子邮件处理工作流程中需要跟踪哪些信息:
class EmailState(TypedDict):
    # 正在处理的电子邮件
    email: Dict[str, Any]  # 包含主题、发件人、正文等。

    # 分析与决策
    is_spam: Optional[bool]

    # 响应生成
    draft_response: Optional[str]

    # 处理元数据
    messages: List[Dict[str, Any]]  # 跟踪与 LLM 的对话以进行分析
💡 **提示:**让您的状态足够全面,以跟踪所有重要信息,但避免用不必要的细节使其变得臃肿。
第 2 步:定义我们的节点
现在,让我们创建将形成我们节点的处理函数:
# Initialize our LLM
model = ChatOpenAI(temperature=0)

def read_email(state: EmailState):
    """小安 reads and logs the incoming email"""
    email = state["email"]

    # 在这里我们可能会做一些初步的预处理
    print(f"小安 is processing an email from {email['sender']} with subject: {email['subject']}")

    # 这里不需要更改状态
    return {}

def classify_email(state: EmailState):
    """小安 uses an LLM to determine if the email is spam or legitimate"""
    email = state["email"]

    # 为 LLM 准备提示
    prompt = f"""
    As 小安 the butler, analyze this email and determine if it is spam or legitimate.

    Email:
    From: {email['sender']}
    Subject: {email['subject']}
    Body: {email['body']}

    First, determine if this email is spam. If it is spam, explain why.
    If it is legitimate, categorize it (inquiry, complaint, thank you, etc.).
    """

    # Call the LLM
    messages = [HumanMessage(content=prompt)]
    response = model.invoke(messages)

    # 解析响应的简单逻辑(在实际应用中,您需要更强大的解析)
    response_text = response.content.lower()
    is_spam = "spam" in response_text and "not spam" not in response_text

    # 如果是垃圾邮件,请提取原因
    spam_reason = None
    if is_spam and "reason:" in response_text:
        spam_reason = response_text.split("reason:")[1].strip()

    # 确定类别是否合法
    email_category = None
    if not is_spam:
        categories = ["inquiry", "complaint", "thank you", "request", "information"]
        for category in categories:
            if category in response_text:
                email_category = category
                break

    # 更新消息以进行追踪
    new_messages = state.get("messages", []) + [
        {"role": "user", "content": prompt},
        {"role": "assistant", "content": response.content}
    ]

    # 返回状态更新
    return {
        "is_spam": is_spam,
        "spam_reason": spam_reason,
        "email_category": email_category,
        "messages": new_messages
    }

def handle_spam(state: EmailState):
    """小安 discards spam email with a note"""
    print(f"小安 has marked the email as spam. Reason: {state['spam_reason']}")
    print("The email has been moved to the spam folder.")

    # 我们已处理完这封电子邮件
    return {}

def draft_response(state: EmailState):
    """小安 drafts a preliminary response for legitimate emails"""
    email = state["email"]
    category = state["email_category"] or "general"

    # 为 LLM 准备提示词
    prompt = f"""
    As 小安 the butler, draft a polite preliminary response to this email.

    Email:
    From: {email['sender']}
    Subject: {email['subject']}
    Body: {email['body']}

    This email has been categorized as: {category}

    Draft a brief, professional response that Mr. Hugg can review and personalize before sending.
    """

    # Call the LLM
    messages = [HumanMessage(content=prompt)]
    response = model.invoke(messages)

    # 更新消息以进行追踪
    new_messages = state.get("messages", []) + [
        {"role": "user", "content": prompt},
        {"role": "assistant", "content": response.content}
    ]

    # 返回状态更新
    return {
        "draft_response": response.content,
        "messages": new_messages
    }

def notify_mr_hugg(state: EmailState):
    """小安 notifies Mr. Hugg about the email and presents the draft response"""
    email = state["email"]

    print("\n" + "="*50)
    print(f"Sir, you've received an email from {email['sender']}.")
    print(f"Subject: {email['subject']}")
    print(f"Category: {state['email_category']}")
    print("\nI've prepared a draft response for your review:")
    print("-"*50)
    print(state["draft_response"])
    print("="*50 + "\n")

    # 我们已处理完这封电子邮件
    return {}
步骤 3:定义我们的路由逻辑
我们需要一个函数来确定分类后要采取哪条路径:
def route_email(state: EmailState) -> str:
    """Determine the next step based on spam classification"""
    if state["is_spam"]:
        return "spam"
    else:
        return "legitimate"
💡 注意: LangGraph 调用此路由函数来确定在分类节点之后要跟随哪条边。返回值必须与我们的条件边映射中的一个键匹配。
步骤 4:创建 StateGraph 并定义边
现在我们将所有内容连接在一起:
# 创建 graph
email_graph = StateGraph(EmailState)

# 添加 nodes
email_graph.add_node("read_email", read_email)
email_graph.add_node("classify_email", classify_email)
email_graph.add_node("handle_spam", handle_spam)
email_graph.add_node("draft_response", draft_response)
email_graph.add_node("notify_mr_hugg", notify_mr_hugg)

# 添加 edges - 定义流程
email_graph.add_edge("read_email", "classify_email")

# 从 classify_email 添加条件分支
email_graph.add_conditional_edges(
    "classify_email",
    route_email,
    {
        "spam": "handle_spam",
        "legitimate": "draft_response"
    }
)

# 添加最后的 edges
email_graph.add_edge("handle_spam", END)
email_graph.add_edge("draft_response", "notify_mr_hugg")
email_graph.add_edge("notify_mr_hugg", END)

# 编译 graph
compiled_graph = email_graph.compile()
注意我们如何使用 LangGraph 提供的特殊“END”节点。这表示工作流完成的终端状态。
本站实战工作台
Host、Client 与 Server 各守一段边界
Host 是运行 Agent 的应用,MCP Client 维护协议连接,Server 提供 Resources、Tools 与 Prompts。Server 能做什么取决于自身权限;协议兼容不等于可信,也不代表 Host 应自动批准所有能力。
本地文件 Server 练习
创建 fixtures/public-docs,只放三篇假文档。配置 Server 仅对该目录只读。初始化时记录协议版本与能力;列出 Resources;读取一份文档;调用越界路径,预期 PERMISSION_DENIED。
Agent policy
   ↓
Host ─ MCP Client ║ MCP Server ─ allowed directory
                  ║          ╲─ denied parent/secret
Capability discovery 不是授权
Server 宣布 write_file 并不代表调用被允许。Host 根据用户、会话和风险再过滤工具。工具 schema 需要服务端校验,Resource 文本作为不可信数据处理。
生命周期与错误
测试连接、能力变化、超时、断开和重连。重连后重新协商,不缓存过期 schema。每次工具调用带 requestId,幂等动作可安全重试,高影响动作不自动重放。
远程 Server 的附加问题
认证 token 放安全存储,TLS 验证开启,域名固定,日志脱敏。确认服务商保留数据多久、是否用于训练、怎样删除。不要把数据库管理员账号交给只需读取两张表的 Server。
交付信任图
图中标出数据方向、身份、权限、加密、日志和人工批准点;附四条测试输出。只有越界和断线都被安全处理,连接才算完成。